
Productivity is a hot topic in the translation industry. As many of us are paid per word, it is in our interest to produce translations faster, with no compromise on the final quality. While there is not much we can do to programmatically accelerate our creative thinking, repetitive tasks performed on a computer can easily be automated.
In this article, I will introduce AutoHotkey, a very handy software that lets you link hotkeys (keyboard shortcuts) to actions (opening an URL, inserting a text template…), and this in any software.
To do this, you will need to write scripts. It may sound scary if you have no programming experience, but I will try to make it as easy as possible by sharing a number of example AutoHotkey scripts, so that any translator can start writing their own scripts.
Click on any chapter below to access it directly.
Contents
- Getting started
- Special character insertion
- Simulating clicks anywhere on the screen
- Opening/Switching between programs
- Opening an URL for online search (Google, online glossaries…)
- Action sequences and pausing between actions
- Text template insertion (e-mails, frequent sentence patterns…)
- Swapping between uppercase/lowercase
- Closing Words and Resources
Getting started
1. Download and install AutoHotkey
AutoHotkey (AHK) is a free, open-source automation software for Windows that allows users to automate repetitive tasks.
You can download it here: http://ahkscript.org/. It is very light and installs in a second (or so).
2. Create a script file
The idea of AHK is to link hotkeys to scripts that automatically execute certain tasks, such as opening a website.
First of all, we need a place to store our scripts. In a text editor (I recommend Notepad++), create a file and save it with the .ahk extension (for example, “myscripts.ahk”). You can simply create a blank file, then use File > Save as… and select “All files (*.*)” as File Type to be able to save .ahk files.
When you want to start AHK, just double-click your script file. Please note that after any change you make, you will need to double-click the file again to apply your edits.
When you want to add a script, just copy/paste the code I will share in your script file (anywhere before/after the other scripts is fine), and make the tweaks you need.
A quick script example
To be able to create hotkeys, it is important to understand how AHK scripts are built.
Here is a simple script example:
^+n::
Run Notepad
return
-The first line contains the hotkey (“^+n”, see explanation below), followed by “::” to indicate the function starts here
-The second line is the action triggered by the hotkey. Here, it opens Windows Notepad.
-The third line indicates the end of the script
The hotkey in our example is “^+n”, with one character per key. Here, the hotkey is Control(^) + Shift(+) + n.
You can try playing around with it: for example, replace ‘n’ with another letter or a digit. For non-alphanumerical keys, you can refer to this page: http://www.autohotkey.com/docs/Hotkeys.htm
As you can see, you can also use keys such as the Windows key ‘#‘ and Alt ‘!’.
For example, if you want to use Shift + Alt + p as a hotkey to run Notepad, you could use the following script:
+!p::
Run Notepad
return
Special character insertion
Note: if you are new to AHK, please read the Getting started section first. It will allow you to get a basic understanding of how scripts work and how you can customize your hotkeys.
Adding special characters to a text can be tedious. The shortcuts are hard to remember and rather long to type.
Some CAT tools allow to insert some of them in just a click, but all the ones you need may not be there – if you are using a CAT tool at all.
In French for example, we are often asked to use « chevrons » instead of “straight quotation marks”. If you want to type the whole thing out manually, you would have to keep Alt pressed and then press 0171, 0160 twice (non-breakable spaces), 0187 and then get back between the quotes to finally be able to type your text. And it works only if your keyboard allows itt, which is not the case for most notepads I have worked with.
But AHK allows you to do that in a keystroke. See the example below:
^+q::
Send {ASC 0171}{ASC 0160}{ASC 0160}{ASC 0187}{left 2}
Return
If you press Ctrl + Shift + q, AHK will output an opening chevron, two non-breakable spaces and a closing chevron, then send the cursor back to between the quotes by simulating 2 keystrokes on the “Left” key.
More specifically, {ASC XXXX} allows you to output the ASCII character of your choice.
Explanation and customization
Note: if you are new to AHK, please read the Getting started section first. It will allow you to get a basic understanding of how scripts work and how you can customize your hotkeys.
The “Send” function simulates a keystroke or a series of keystrokes. After “Send”, you can write any standard text you want to be output.
Alphanumerical characters can be written directly, without any special marking. For the other keys, you will find a list here: http://www.autohotkey.com/docs/commands/Send.htm
So if you want to output a tabulation, you can write “Send {Tab}” in your script.
If you want to repeat a keystroke, you can add a number, preceded by a space before the closing bracket, like in the example ({left 2} = 2 strokes on the “Left” key).
As you will see on the same page, {ASC XXXX} allows you to simulate a Alt + 0000-like series of keystrokes. You can see a list of such combinations on the following page: http://www.danshort.com/ASCIImap/
For example, if you want to output a copyright mark, you would write “Send {ASC 0169}”.
Once you get familiar with the two resources above, it becomes very easy to create your own sequences of complex characters.
Simulating clicks anywhere on the screen
Note: if you are new to AHK, please read the Getting started section first. It will allow you to get a basic understanding of how scripts work and how you can customize your hotkeys.
AHK offers several functions to simulate clicks on different parts of the screen, which can be very useful if you need to automate certain tasks.
What we will need first is the coordinates of the location that is going to be clicked. There is an infinity of ways to do this, so I will just share my personal method:
– I use IrfanView, a very handy (and free!) software that allows you to do basic manipulations on images and easily switch between file formats. If you often need to convert image files or take screenshots for your clients, this software is extremely useful.
– Open the software for which you want to automate clicks, and take a screenshot by using your keyboard’s Print Screen key. It will be temporarily stored in the clipboard.
– Open IrfanView and paste the screenshot (Ctrl + V). Then click on the place where you want AHK to simulate a click, and hold the mouse button down.
The title bar should look like this:
![]()
The two numbers coming after “XY:” are the coordinates. In this example, x = 55 and y = 10. Write down the values you got.
Then use the following code
———————
^!c::
{
mousegetpos, start_x, start_y
mouseclick, left, 55, 10
mousemove, %start_x%, %start_y%, 0
}
return
———————
Of course you should replace 55 and 10 with your own values.
Opening/Switching between programs
Note: if you are new to AHK, please read the Getting started section first. It will allow you to get a basic understanding of how scripts work and how you can customize your hotkeys.
AHK allows you to open programs or switch to any program easily.
By default, AHK offers distinct functions for opening/switching between programs, which can lead to errors, for example if you’re trying to switch to a program that is not opened.
To avoid this issue, we will create a function called RunOrActivate to handle all possible situations (opening a program, switching to an open program or starting and switching to a program).
You can just copy the code below in your script file and leave it unedited:
———————
RunOrActivate(Target, WinTitle = “”)
{
; Get the filename without a path
SplitPath, Target, TargetNameOnly
Process, Exist, %TargetNameOnly%
If ErrorLevel > 0
PID = %ErrorLevel%
Else
Run, %Target%, , , PID
; At least one app (Seapine TestTrack wouldn’t always become the active
; window after using Run), so we always force a window activate.
; Activate by title if given, otherwise use PID.
If WinTitle <>
{
SetTitleMatchMode, 2
WinWait, %WinTitle%, , 3
TrayTip, , Activating Window Title “%WinTitle%” (%TargetNameOnly%)
WinActivate, %WinTitle%
}
Else
{
WinWait, ahk_pid %PID%, , 3
TrayTip, , Activating PID %PID% (%TargetNameOnly%)
WinActivate, ahk_pid %PID%
}
SetTimer, RunOrActivateTrayTipOff, 1500
}
———————
Now, let’s create a script to use this function:
^!t::
RunOrActivate(“SDLTradosStudio.exe”)
return
Where you can of course replace “SDLTradosStudio.exe” with the process name of the software of your choice.
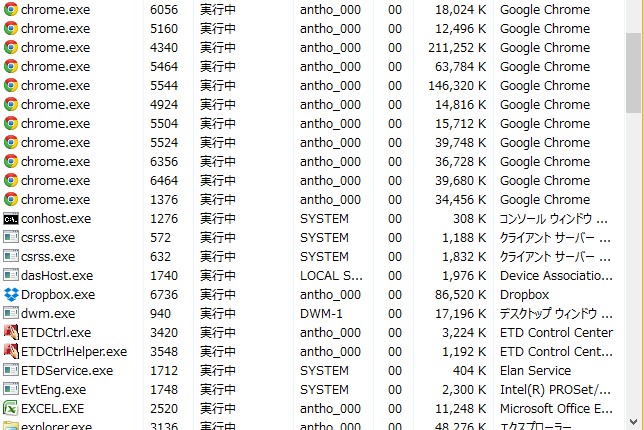
To find the process name, you can use Windows’ Task Manager: Go to Start – Run… (or press Windows key + R) and write “taskmgr” in the text box, then press OK.
Once the Task Manager is opened, go to the “Details” tab (if it doesn’t appear, you may have to click on a “More details” button first), and you will have the process names in the first column.
Opening an URL for online search (Google, online glossaries…)
Note: if you are new to AHK, please read the Getting started section first. It will allow you to get a basic understanding of how scripts work and how you can customize your hotkeys.
Being able to open URLs in a single keystroke can be very convenient and a big time saver. For example, if you want to check the meaning of a word in your favorite online dictionary, chances are that we will be able to automate that with AHK.
To open a URL in your default browser, you can use the “run” function, for example:
run “http://SomeUrl.com”
Now, to make this a little more dynamic and useful, we can customize the URL with the text you are highlighting. For example, here is the code to perform a basic Google search with the term you are currently highlighting, whatever the software you are using.
^!g::
send ^c
clipwait
run “http://www.google.com/search?q=%clipboard%”
return
“send ^c” simulates a Copy command (Ctrl + C) to copy the highlighted text in the clipboard. “clipwait” is here to ensure AHK doesn’t try to open the URL before the text is copied in the clipboard.
In the “run” line, “%clipboard%” is the text currently contained in your clipboard.
Customizing URLs
If you want to automate search on some of your favorite sites, you will first need to perform a manual search, copy the URL of the search results and look for the string you searched. Then replace it with %clipboard% in the script file.
For example, if you search for the term “MyQuery” on a website like Linguee, the URL will look like this:
http://www.linguee.fr/francais-anglais/search?source=auto&query=MyQuery
So in your AHK script, you would write:
run “http://www.linguee.fr/francais-anglais/search?source=auto&query=%clipboard%”
Most online dictionaries and glossaries have similar URLs. Just give it a try!
Action sequences and pausing between actions
Note: if you are new to AHK, please read the Getting started section first. It will allow you to get a basic understanding of how scripts work and how you can customize your hotkeys.
A great thing about AHK is that it allows you to execute several actions in a row. You can simply write one action per line, and AHK will trigger them in sequence.
Now, some actions may rely on the completion of others. For example, if you want to open a program and then launch the “Open file” dialog box, you will have to be sure the program is properly started before you send the next keystroke.
You can do this easily with the “sleep” function, which allows you to ask AHK to wait for a predetermined time in milliseconds before moving to the next action.
The script below runs or activates Notepad using the function we created in the lesson “Opening/Switching between programs”, waits for 3 seconds and then simulates the Ctrl + O keystroke to trigger the “Open a file” dialog box:
+!n::
RunOrActivate(“Notepad.exe”)
sleep, 3000
send ^o
return
This example is very simple, but you can potentially automate any sequence of actions on your computer. I like to use a keystroke to open all the programs I typically use on a working day, or all the websites I read on a daily basis.
Text template insertion (e-mails, frequent sentence patterns…)
Note: if you are new to AHK, please read the Getting started section first. It will allow you to get a basic understanding of how scripts work and how you can customize your hotkeys.
As a translator, you probably send a lot of e-mails that are very similar in content, except for the recipient name, the fee/deadline you offer, etc. Writing such e-mails can be tedious and take a lot of time. Let’s use AHK to automate as much of the process as possible.
I already mentioned the “send” command a couple of times so far, to automate keystrokes. You can use it to output complete texts.
Another thing AHK allows you to do is to ask the user for a string input with the “InputBox” function. In the example below, we ask the user to type the recipient’s name and output a personalized e-mail template.
We will also see a new way to trigger scripts. Here, the template is sent out by typing “tmp1” on your keyboard and pressing Enter. You can customize this by replacing “tmp1” by any text you to trigger a script. Don’t forget to press Enter after typing out the string. And of course you can use more conventional hotkeys to do this.
:oc:tmp1::
InputBox, PMName, Please type the PM’s name, Name:
send Dear %PMName%,{enter}{enter}Thank you for contacting me about this project…
return
Here, we are using InputBox to show a dialog box titled “Please type the PM’s name” with a field labeled “Name:”. The value the user enters is stored into the variable “PMName” (feel free to use any variable name you like here). You can also show several such dialog boxes in a row if you need to get several values.
Then the “send” command outputs the template. %PMName% refers to the previous user input, surrounded with “%” so that AHK understands it has to insert a customized value here.
For the send command, you can type alphanumerical characters normally, but the other keys have a special coding, like {enter} in our example. You will find the complete list of these keys here: http://www.autohotkey.com/docs/commands/Send.htm
Swapping between uppercase/lowercase
Note: if you are new to AHK, please read the Getting started section first. It will allow you to get a basic understanding of how scripts work and how you can customize your hotkeys.
I will share two useful functions: All uppercase and all lowercase. This can be very convenient when you have to type a whole text in capital letters: just write your text normally, and then apply the script to convert it in uppercase in a single keystroke.
You can use the scripts as they are, simply customizing the keystroke. What they do is converting the text currently highlighted. If you prefer to convert the text already in the clipboard instead, you can delete the first three lines of each script (from “Clipboard =” to “Clipwait”).
All uppercase
!+u::
Clipboard =
SendInput, ^c
ClipWait
StringReplace, OutputText, Clipboard, `r`n, `n, All
StringUpper, OutputText, OutputText
SendRaw % OutputText
Return
All lowercase
!+l::
Clipboard =
SendInput, ^c
ClipWait
StringReplace, OutputText, Clipboard, `r`n, `n, All
StringLower, OutputText, OutputText
SendRaw % OutputText
VarSetCapacity(OutputText, 0)
Return
NOTE: Some CAT tools have an awful lot of hotkeys, which may be triggered by this script. If possible, try to avoid using “Ctrl” in your hotkey here.
Deactivating the Insert key (or any key)
Note: if you are new to AHK, please read the Getting started section first. It will allow you to get a basic understanding of how scripts work and how you can customize your hotkeys.
I hate it when I press the “Insert” key by accident and start seeing text disappearing as I type.
The two following scripts respectively deactivate the use of the “Insert” key alone and replace it with the “Ctrl + Insert” keystroke
$Insert::return
^Insert::Send, {Insert}
You can make it work for about any key you want – not just do deactivate keys, but also change their function.
Closing Words and Resources
The AHK documentation and forums are great places to start if you want to go further. If the documentation looks scary to you, you may find the forums more welcoming. They contain tons of useful tutorials and example AutoHotkey scripts.
If there are specific scripts you would like to see added here, just let me know by e-mail!